Setting up MediaWiki using Docker Compose and Mariadb: Difference between revisions
No edit summary |
No edit summary |
||
| (6 intermediate revisions by the same user not shown) | |||
| Line 1: | Line 1: | ||
__NOTOC__ | |||
=== [[Main Page|Back to Homepage]] === | === [[Main Page|Back to Homepage]] === | ||
=== | === Prerequisites === | ||
You will need to have a basic understanding of linux commands and docker. This has been tested on Ubuntu linux. This guide does not go into depth on installing Docker and docker-compose | |||
<pre> | |||
I found it a little hard to setup MediaWiki for the first time using Docker and getting all the database working correctly. I have now run a few instances of it and decided to write a short post on getting it working. To get the best out of this system I also use NGINX Reverse proxy and NO-IP Dynamic DNS service. This links my Domain name to my Dyanmic DNS service which constantly updates with my Current IP address. NGINX receives the incoming subdomain requests and points them to the correct place within my network. | |||
</pre> | |||
===1: Setting up directory and docker-compose.yml file=== | ===1: Setting up directory and docker-compose.yml file=== | ||
| Line 111: | Line 114: | ||
</pre> | </pre> | ||
'''2''' - Edit your docker-compose.yml file and remove the '''#''' from the start of this line | '''2''' - Edit your '''docker-compose.yml''' file and remove the '''#''' from the start of this line | ||
<pre> | <pre> | ||
| Line 117: | Line 120: | ||
</pre> | </pre> | ||
'''3''' - Change the permissions on the LocalSettings.php file using chmod | '''3''' - Change the permissions on the '''LocalSettings.php''' file using '''chmod''' | ||
<pre> | <pre> | ||
| Line 123: | Line 126: | ||
</pre> | </pre> | ||
'''4''' - Recreate the mediawiki container by using docker-compose | '''4''' - Recreate the mediawiki container by using '''docker-compose''' | ||
<pre> | <pre> | ||
| Line 137: | Line 140: | ||
[[File:Mediawiki-7.jpg|none|thumb]] | [[File:Mediawiki-7.jpg|none|thumb]] | ||
'''2''' - To access mediawiki remotly you need to approve the qualified URL that will be accessing the wiki. Modify '''LocalSettings.php''' and add your URL to this part of the file. This needs to be setup via your Domain | |||
'''2''' - To access mediawiki remotly you need to approve the qualified URL that will be accessing the wiki. Modify '''LocalSettings.php''' and add your URL to this part of the file. This needs to be setup via your Domain and NGINX reverse proxy or by using a free dynamic DNS service like NO-IP | |||
<pre> | <pre> | ||
## The protocol and server name to use in fully-qualified URLs | ## The protocol and server name to use in fully-qualified URLs | ||
$wgServer = "http://192.168.0.58: | $wgServer = "http://192.168.0.58:4820"; | ||
$wgServer = "http://subdomain.mydomain.com"; | $wgServer = "http://subdomain.mydomain.com"; | ||
</pre> | </pre> | ||
Latest revision as of 23:40, 23 November 2024
Back to Homepage
Prerequisites
You will need to have a basic understanding of linux commands and docker. This has been tested on Ubuntu linux. This guide does not go into depth on installing Docker and docker-compose
I found it a little hard to setup MediaWiki for the first time using Docker and getting all the database working correctly. I have now run a few instances of it and decided to write a short post on getting it working. To get the best out of this system I also use NGINX Reverse proxy and NO-IP Dynamic DNS service. This links my Domain name to my Dyanmic DNS service which constantly updates with my Current IP address. NGINX receives the incoming subdomain requests and points them to the correct place within my network.
1: Setting up directory and docker-compose.yml file
1 - First we need to create our directory. For this test we will be using
/home/john/docker/testwiki
2 - Inside this folder we need to create a file named docker-compse.yml and copy the following into it
# MediaWiki with MariaDB docker-compose file
#
# Access via "http://localhost:4820"
# or "http://serveripaddress:4820" if using docker-machine or accessing from another PC
#
# MariaDB accessed via "http://localhost:4840"
# or "http://serveripaddress:4840" if using docker-machine or accessing from another PC

version: '3'
services:
  mediawiki:
    image: mediawiki
    restart: always
    ports:
      - 4820:80
    links:
      - database
    volumes:
      - /home/john/docker/testwiki/images:/var/www/html/images
      # After initial setup, download LocalSettings.php to the same directory as
      # this yaml and uncomment the following line and use compose to restart
      # the mediawiki service
      #- /home/john/docker/testwiki/LocalSettings.php:/var/www/html/LocalSettings.php
  # This key also defines the name of the database host used during setup instead of the default "localhost"
  database:
    image: mariadb
    restart: always
    ports:
      - 4840:3306
    environment:
      # @see https://phabricator.wikimedia.org/source/mediawiki/browse/master/includes/DefaultSettings.php
      MYSQL_DATABASE: testwikidb
      MYSQL_USER: testwikiuser
      MYSQL_PASSWORD: testwikipassword
      MYSQL_RANDOM_ROOT_PASSWORD: 'yes'
    volumes:
      - /home/john/docker/testwikidb/db:/var/lib/mysql

volumes:
  images:
  db:
2: Running the compose file
1 - Navigate to where your docker-compose.yml file is and type the following
docker-compose up -d
2 - Once docker has download the required images it will setup mediawiki and mariadb as required
john@server:~/docker/testwiki$ docker-compose up -d
Creating network "testwiki_default" with the default driver
Creating volume "testwiki_images" with default driver
Creating volume "testwiki_db" with default driver
Creating testwiki_database_1 ... done
Creating testwiki_mediawiki_1 ... done
john@server:~/docker/testwiki$
3 - The compose file will create a new directory for mariadb
/home/john/docker/testwikidb
3: Setting up mediawiki installation
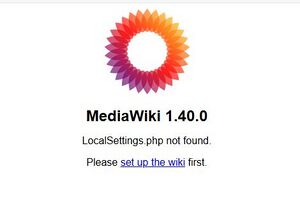
1 - Navigate to http://serveripaddress:4820 and click on Please set up the wiki first.
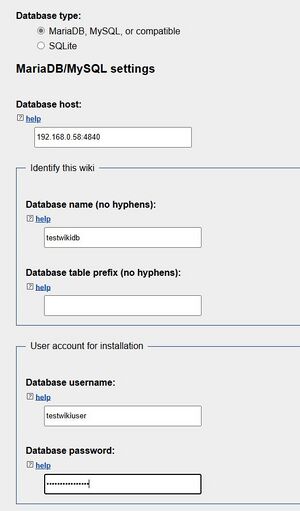
2 - Continue through the first few pages until you get to the DB setup page. This is where you fill out your Db details from your docker-compose file. In our instance the server we are using is located at 192.168.0.58 and the maria Db is on port 4840
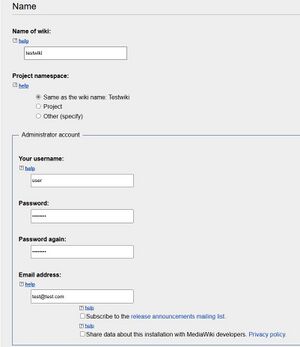
3 - Now setup your wiki name, username and password
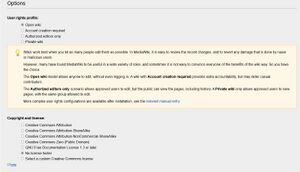
4 - Setup your wiki privacy options for your requirements
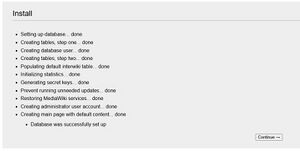
5 - The final stage is to confirm that everything has been set up and click continue
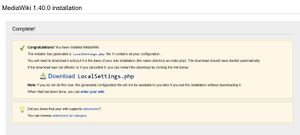
6 - The last page provides you with a download link for LocalSettings.php
4: Final setup of LocalSetting.php
1 - Copy the newly created LocalSettings.php to your root folder
john@server:~/docker/testwiki$ ls
docker-compose.yml  images  LocalSettings.php
john@server:~/docker/testwiki$
2 - Edit your docker-compose.yml file and remove the # from the start of this line
- /home/john/docker/testwiki/LocalSettings.php:/var/www/html/LocalSettings.php
3 - Change the permissions on the LocalSettings.php file using chmod
john@server:~/docker/testwiki$ chmod 777 LocalSettings.php
4 - Recreate the mediawiki container by using docker-compose
john@server:~/docker/testwiki$ docker-compose up -d
testwiki_database_1 is up-to-date
Recreating testwiki_mediawiki_1 ... done
john@server:~/docker/testwiki$
5: Accessing mediawiki locally and remotely
1 - To access mediawiki locally navigate to http://serveripaddress:4820 to access your wiki

2 - To access mediawiki remotly you need to approve the qualified URL that will be accessing the wiki. Modify LocalSettings.php and add your URL to this part of the file. This needs to be setup via your Domain and NGINX reverse proxy or by using a free dynamic DNS service like NO-IP
## The protocol and server name to use in fully-qualified URLs
$wgServer = "http://192.168.0.58:4820";
$wgServer = "http://subdomain.mydomain.com";